HOW TO CUT AND SEW PENCIL TROUSER
.
Until this time trouser was men’s wear only; now both women and men wear trousers. Trousers can be made in a number of different fabrics, including wool, tweed, linen, crepe, jersey and denim. They can be slightly hard to create because they require many accurate measurements and some dedicated time to properly craft them. In order to make trouser, you need to be familiar with fundamental stitches and sewing machine use. Trouser can be of different types but as far as this article is concern, am going to discuss about pencil trouser (so to say).
Below are the steps to be taken in cut and sew of pencil trouser.
Step one
Measurement :
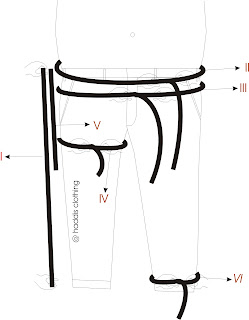
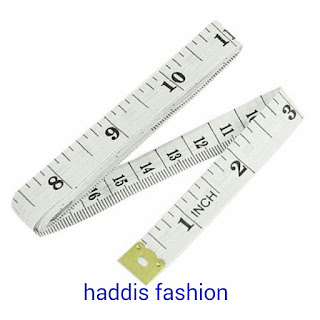
a. Trouser length: using a fabric measurement tape, stretch it from the start of the waist to the ankle. As shown above in label I.
b. Trouser waist: stretch the tape round the waist as shown above in label II.
c. Trouser hip: stretch the tape round the circumference of the hip from the widest point of the hip as shown above in label III
d. Trouser thigh: stretch the tape round the circumference at the widest point of the thigh as shown above in label IV
e. Trouser half length: stretch the tape start from the waist to the knee as shown above in label V
f. Trouser ankle: stretch the tape round the ankle as shown above in label VI
Step two
Cutting:-
From the above measurements, let's assume the following figures;
Trouser length = 42
Trouser waist = 34
Trouser hip = 38
Trouser thigh = 25
Trouser half length = 22
Trouser ankle = 17
All measurements are in inches.
Now, to cut the front side;
a. Trouser length is 42
Note; add 2 to the length measured for folding allowance. Therefore, length is 44
b. Trouser waist is 34
Note; divide the waist measured into four and then add 2 (sewing allowance) to it, to make up the front side.
34/4 = 8½ + 2 = 10½,
Therefore, front side is 10½.
c. Trouser hip is 38
Note; for general case, hip measured always rime with the front side calculated except for those that have big bottom, and in that case use the hip measured to determine the front side.
d. Trouser thigh is 25
Note; before you locates the thigh, measure the flap first which is 9½ for length 40-45, 9 for length 35-39, 8½ for length 30-34.
After measured the flap, divide the measured thigh into 2, which is 12½.
e. Trouser half length is 22
Note; to locate the trouser half length, minus the band from it. Band can be 1½ or 2; for this I choose 1½. Therefore, half length is 21 including ½ sewing allowance.
f. Trouser ankle is 14
Note; divide it into 2, which is 7.
Sewing allowance for the trouser thigh and ankle will be added to the back side of the trouser.
Now to cut the back side;
Just place the front side cut as shown above to cut the back side
>Remember, nobody knows all. Anybody is free to contribute.
By haddisfashion
haddisfashion@gmail
Whatsapp @ 08032231986
Facebook.com/haddisclothing
Instagram @ haddisfashion


In der Tat informativer Beitrag, ich lese regelmäßig Beiträge. da wir Herrenanzug zu günstigen Preisen anbieten. Weitere Informationen finden Sie auf unserer Website hochzeitsanzug
ReplyDeleteMost sewing machines are well built and will last for many years with only a few parts needing replacement. basic sewing machine
ReplyDeleteThanks for enlightening us
ReplyDeleteThank you so much.
ReplyDeleteThanks it was helpful
ReplyDeleteFantastic
ReplyDeleteThank a lot
ReplyDeleteThank you so much
ReplyDeleteVery helpful
ReplyDeleteUnderstandable explanation great 👌
ReplyDeleteThanks for this
ReplyDeleteThanks alot
ReplyDeleteThanks alot
ReplyDeleteThanks for the Enlightenment
ReplyDeleteThiß is so clearly thanks a lot
ReplyDeleteNice one
ReplyDeleteVery helpful
ReplyDeleteThe explanation was easy to understand
ReplyDeleteThanks🤗
Appreciate
ReplyDeleteThanks
ReplyDeleteYou're blessed. Very helpful and stress-free.
ReplyDeleteThanks
ReplyDeleteThanks alot we appreciate you really did a good job
ReplyDeleteThanks
ReplyDeleteReally appreciate your cutting steps and explanations. God bless your contributions to upcoming fashion designers.
ReplyDeleteI will really appreciate similar steps for native long sleeves and short sleeves. Thanks
ReplyDeleteA very innovative and effective blog, This blog is written according to the modern era.
ReplyDeletepolo shirts workwear with affordable price
Thanks so much. This is very helpful. It's so easy to understand
ReplyDeleteHelpful to me
ReplyDeleteHelpful to me
ReplyDeleteHow can I make the hops
ReplyDeleteIt's explainable
ReplyDeleteWhat is the best flap measurements for kids ?
ReplyDeleteThanks so much, I found this very helpful
ReplyDeleteBy Flap, do you mean the crotch?
ReplyDeletePlease how many do you major from waist to hip
ReplyDelete